

If you're new to Redux Toolkit, I covered the RTK fundamentals in a previous article, including why it's the officially recommended approach, its advantages, and how to use its main APIs to create a basic store.
In this article, we'll explore powerful Redux Toolkit techniques to streamline state management in complex projects:
- Triggering updates across multiple slices using
createAction. - Managing normalized state efficiently with
createSliceandcreateEntityAdapter. - Optimizing data access with
createSelector. - Enhancing reusability with custom hooks leveraging
useSelector.
By mastering these techniques, you'll gain greater flexibility and maintainability in your Redux applications, ensuring they scale effectively. Let’s dive in! 🚀
Introduction to Advanced Redux Toolkit Techniques
Throughout this article, I'll walk you through key techniques using code snippets from a straightforward yet comprehensive project I built to showcase all the core features of Redux Toolkit (RTK) mentioned above. You're welcome to explore the full repository on GitHub for a deeper dive into the files.
The aim here isn’t to overwhelm you with unnecessary complexity but to demonstrate with 7 practical steps how to start designing an efficient architecture for large-scale applications using RTK. By the end of this article, you'll have valuable insights into how to scale and structure future projects with greater efficiency and clarity.
Before we start
Before diving into the techniques, I want to provide some context so you can better understand the approach we're taking and absorb the information more effectively.
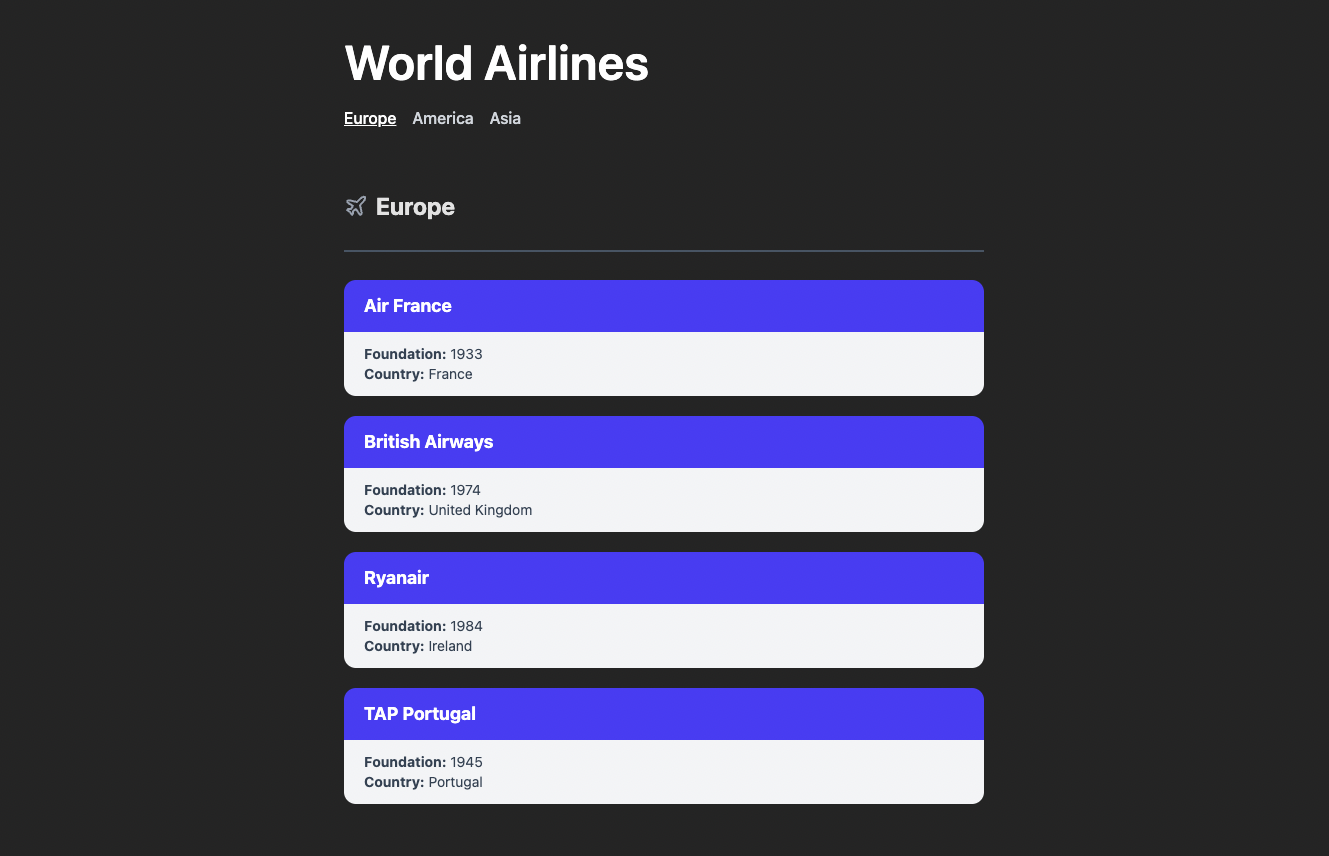
Let’s imagine a page that lists airlines based on the selected region. The page includes a header with links to different regions (e.g., Europe, America, Asia). Each time a region is selected, we fetch airline data from an API based on that region.
The returned data contains a list of airlines structured like this:
// endpoint: http://localhost:5002/airlines/europe
[
  {
    "id": 101,
    "name": "Air France",
    "foundation": 1933,
    "country": {
      "id": 201,
      "name": "France"
    }
  },
  {
    "id": 102,
    "name": "Ryanair",
    "foundation": 1984,
    "country": {
      "id": 202,
      "name": "Ireland"
    }
  },
  ...
]
Check out the full JSON file here.
The goal is to fetch this data, normalize it, and update the relevant slices in our Redux store. Here's the structure of our Redux store:
store
├── airlines
├── countries
├── pointers
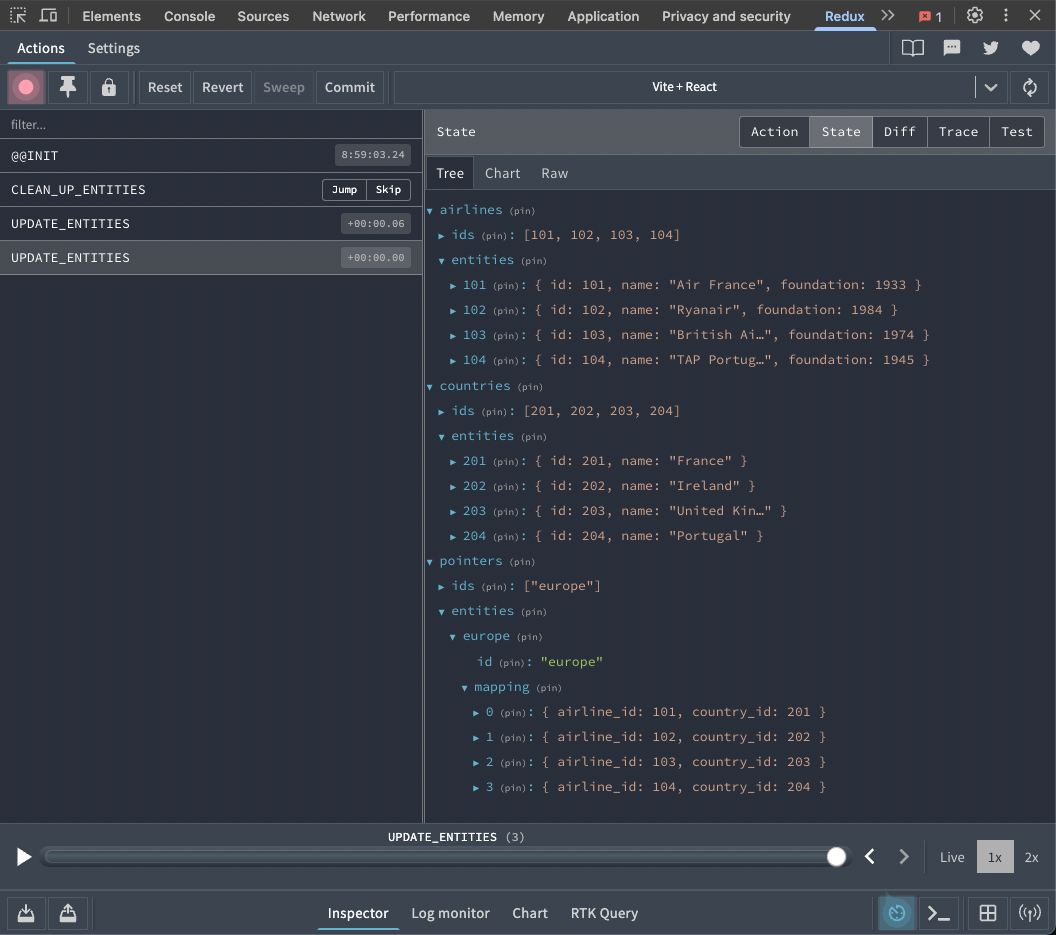
The airlines slice will store a list of airlines, where each entry will look like { id: 101, name: 'Air France', foundation: 1933 }, for example. The countries slice will follow a similar structure for countries { id: 201, name: France }. The pointers slice will store relationships between airlines and countries, such as { airline_id: 101, country_id: 201 }. These pointers will allow us to easily reference data from other slices.
Once all the data is in the store, we'll use RTK selectors and custom hooks to get the data to be used by the UI components.
Now we are ready! 😄
1- Handling Cross-Slice Actions with createAction
Sometimes, different slices need to react to the same event — like syncing or resetting shared data. With createAction, you can define generic actions that are not tied to a specific slice. These actions carry a payload containing the data to be updated or cleared, allowing any reducer to respond to them. This approach enables clean, modular cross-slice updates without creating dependencies between the slices.
// actions.js
import { createAction } from '@reduxjs/toolkit';

// `updateEntities` will be used to trigger a state update in the reducer
// It will carry the payload that contains the data to be updated in the store
export const updateEntities = createAction('UPDATE_ENTITIES');

// `cleanUpEntities` will be dispatched to clear or reset the data
// This can be useful when you want to remove data from the store, e.g., on component unmount or after a request is completed
export const cleanUpEntities = createAction('CLEAN_UP_ENTITIES');
In this example, two shared actions are created: updateEntities for syncing entity data and cleanUpEntities for clearing it. Other slices can import and respond to these actions in their reducers without depending on each other.
2- Creating Slices That Respond to Shared Actions
Now that we've defined shared actions (updateEntities and cleanUpEntities), let's see how to create slices that respond to them. We'll use createSlice and createEntityAdapter to manage normalized entity state for each slice (airlines, countries and pointers). For a deeper dive into these APIs, check out my RTK fundamentals article.
✈️ Airlines Slice
// airlinesSlice.js
import { createSlice, createEntityAdapter } from '@reduxjs/toolkit';
import { updateEntities, cleanUpEntities } from '@store/actions';

// Create an entity adapter to help manage normalized airline data
export const airlinesAdapter = createEntityAdapter();

// Generate the initial state using the adapter
const initialState = airlinesAdapter.getInitialState();

// Create the airlines slice
const airlinesSlice = createSlice({
  name: 'airlines', // Unique slice name
  initialState, // Initial normalized state
  reducers: {}, // No local reducers needed in this example

  // Use extraReducers to handle shared, cross-slice actions
  extraReducers: (builder) => {
    builder
      // When the updateEntities action is dispatched with a payload containing airline data,
      // the slice will replace the current state with the new set of airlines
      .addCase(updateEntities, (state, action) => {
        if (action.payload.airlines) {
          airlinesAdapter.setAll(state, action.payload.airlines);
        }
      })
      // When the cleanUpEntities action is dispatched (which doesn't need a payload),
      // the slice will remove all airlines from the state
      .addCase(cleanUpEntities, (state) => {
        airlinesAdapter.removeAll(state);
      });
  },
});

// Export the reducer to be used in the store
export default airlinesSlice.reducer;
In this example, the airlines slice uses extraReducers to respond to two shared actions:
updateEntities: Ifaction.payload.airlinesis present, the slice updates its entire entity collection usingsetAll.cleanUpEntities: Clears all airlines from the state using removeAll.
This pattern makes it easy for multiple slices to react to a single source of truth or cleanup event.
A common use case for cleanUpEntities is when a component unmounts—for example, to clear out data that's no longer needed once a page or view is closed. This helps keep your store clean and avoids persisting stale data across views.
Countries & 📍 Pointers slices
The countries slice follows the exact same structure as airlines, simply replacing the key words. Check out the code here.
The pointers slice is nearly identical too, but instead of calling setAll, it uses setOne — since it's likely managing a single pointer entity rather than a list:
if (action.payload.pointers) {
  pointersAdapter.setOne(state, action.payload.pointers);
}
The pointers slice works a bit differently (code here). Instead of receiving an array of pointer entities, it expects them to be grouped by region, like so:
const pointers = {
  id: region,
  mapping: [
    { airline_id: 101, country_id: 201 },
    ...
  ],
};
In this structure, the region name becomes the entity ID, and each entity includes a mapping property containing the list of pointers for that region. This design allows the store to hold pointers for multiple regions at the same time, offering greater flexibility when managing localized data.
Despite this small variation, the slice still integrates smoothly with the shared action system — highlighting how adaptable this pattern is for handling cross-slice updates with diverse data shapes.
3- Setting Up the Store with Our Slices
Now that we have our individual slices defined (airlines, countries, and pointers), the next step is to combine them into a single Redux store. This is done using configureStore from Redux Toolkit.
By registering each slice reducer under its own key, we create a modular structure where each slice manages its own section of the state. Here's how the store is set up:
// store.js
import { configureStore } from '@reduxjs/toolkit';

// Import slice reducers
import airlinesReducer from '@features/airlines/airlinesSlice';
import countriesReducer from '@features/countries/countriesSlice';
import pointersReducer from '@features/pointers/pointersSlice';

// Create and configure the Redux store
export const store = configureStore({
  reducer: {
    // Each slice manages its own section of the state
    airlines: airlinesReducer,
    countries: countriesReducer,
    pointers: pointersReducer,
  },
});
Connecting the Redux Store to React
Note: To make the Redux store available throughout your React app, wrap your root component with the Provider component from react-redux. This allows any component in the tree to access the store using hooks like useSelector and useDispatch that we will see soon.
//...
import { Provider } from 'react-redux';
import { store } from '@store/store';

createRoot(document.getElementById('root')).render(
  <StrictMode>
    <Provider store={store}>
      <Router>
        <App />
      </Router>
    </Provider>
  </StrictMode>
);
4- Sending Data to the Store with dispatch and Shared Actions
Now that our Redux setup is in place, let’s see how to send data to the store using a real-world example. In this case, we have a component called Airlines that:
- Retrieves a region from the URL using
useParams. - Fetches airline data based on that region.
- Normalizes the response using a custom function called
normalizeData(). - Dispatches the
updateEntitiesaction to populate the store. - Cleans up the state on unmount using
cleanUpEntities.
Here’s a simplified version of how it works (full code here):
import { useEffect } from 'react';
import { useDispatch } from 'react-redux';
import { useParams } from 'react-router-dom';

import { updateEntities, cleanUpEntities } from '@store/actions';
import { normalizeData } from '@utils/normalizer';

export default function Airports() {
  const dispatch = useDispatch();
  const { region } = useParams();

  useEffect(() => {
    // Fetch data based on the region
    fetch(`http://localhost:5002/airlines/${region}`)
      .then((res) => res.json())
      .then((data) => {
        // Normalize and dispatch it to the store
        const normalizedData = normalizeData(data, region);
        dispatch(updateEntities(normalizedData));
      });

    // Cleanup the store when the component unmounts
    return () => dispatch(cleanUpEntities());
  }, [dispatch, region]);

  return <div>{/* render something */}</div>;
}
✨ Quick Note on the normalizeData Function:
When the API returns data, it usually comes as a nested list of airlines, like this:
// endpoint: http://localhost:5002/airlines/europe
[
  {
    "id": 101,
    "name": "Air France",
    "foundation": 1933,
    "country": {
      "id": 201,
      "name": "France"
    }
  },
  ...
]
To better structure this for Redux, we normalize the response into a flat format using normalizeData() (code here):
{
  airlines: [
    { id: 101, name: 'Air France', foundation: 1933 },
    ...
  ],
  countries: [
    { id: 201, name: 'France' },
    ...
  ],
  pointers: {
    id: 'europe',
    mapping: [
      { airline_id: 101, country_id: 201 },
      ...
    ],
  },
}
This normalized object is then passed as the payload of our updateEntities action. Thanks to the way each slice is set up, they will automatically update their state with the relevant portion of the payload. Pretty cool, right?
5- Optimizing State Access with Selectors
Selectors allow us to efficiently retrieve specific pieces of data from the Redux store, minimizing unnecessary re-renders by memoizing results. This optimization improves both performance and maintainability of the codebase.
In this section, we'll explore how selectors are defined and used, with an example focused on the airlines feature.
Creating the Selectors
createSelector from Redux Toolkit creates memoized selectors that only recompute when their inputs change. This helps avoid unnecessary recalculations and re-renders, improving performance, especially with complex or nested state.
Airlines selectors
// airlinesSelectors.js
import { createSelector } from '@reduxjs/toolkit';
import { airlinesAdapter } from './airlinesSlice';

// Get the default selector from the airlines slice
const { selectById: selectAirlinesById } = airlinesAdapter.getSelectors(
  (state) => state.airlines
);

// Create a selector to retrieve an airline by its ID
export const selectAirline = (state, airlineId) =>
  selectAirlinesById(state, airlineId);

// Use createSelector to transform the data (e.g., extracting the name of the airline)
export const selectAirlineName = createSelector(
  [selectAirline],
  (airline) => airline?.name
);

// Extract the foundation of the airline
export const selectAirlineFoundation = createSelector(
  [selectAirline],
  (airline) => airline?.foundation
);selectAirline: Retrieves an airline by its unique ID from the store.selectAirlineName: Memoized selector that returns the airline's name and prevents unnecessary re-renders.selectAirlineFoundation: Memoized selector that returns the foundation year and avoids re-renders when unrelated state changes.
Countries selectors
Selectors for countries are very similar to the ones we created for airlines. You can check them out here for reference.
Pointers selectors
For the pointers feature, we'll combine multiple selectors and transform data as part of the selection process. This enables us to retrieve and format data efficiently. Here's an example:
// pointersSelectors.js
import { createSelector } from '@reduxjs/toolkit';
import { pointersAdapter } from './pointersSlice';
import { selectAirlineName } from '@features/airlines/airlinesSelectors';

// Get the basic selector from pointersSlice
const { selectById: selectPointerById } = pointersAdapter.getSelectors(
  (state) => state.pointers
);

// Select pointers based on the region (pointersId)
export const selectPointers = (state, pointersId) =>
  selectPointerById(state, pointersId)?.mapping;

// Select pointers sorted alphabetically by airline name
export const selectPointersByAlphabeticalOrder = createSelector(
  [(state, pointersId) => selectPointers(state, pointersId), (state) => state],
  (pointers, state) => {
    if (!pointers) return [];

    return [...pointers].sort((a, b) => {
      const nameA = selectAirlineName(state, a.airline_id) ?? '';
      const nameB = selectAirlineName(state, b.airline_id) ?? '';
      return nameA.localeCompare(nameB);
    });
  }
);
In this example, we are combining two selectors:
selectPointers: This selector retrieves the list of pointers based on the region (identified by pointersId).selectPointersByAlphabeticalOrder: This custom selector sorts the pointers alphabetically by airline name, making the data more useful for display purposes.
By using createSelector, we not only combine and format the data but also ensure performance optimization by memoizing the results. This prevents unnecessary recalculations and improves the efficiency of the application.
6- Custom Hooks for Redux State
As your application grows, accessing state directly in components using useSelector can lead to repetitive and hard-to-read code. To keep components clean, focused, and maintainable, we can use custom hooks to encapsulate state access logic. This separation of concerns allows your components to concentrate on rendering and interaction, rather than worrying about how data is retrieved from the store.
For example, instead of writing this in every component:
const airlineName = useSelector((state) => selectAirlineName(state, airlineId));We can define a simple custom hook:
export const useAirlineName = (airlineId) =>
  useSelector((state) => selectAirlineName(state, airlineId));
Then use it in a component like so:
const airlineName = useAirlineName(airlineId);This keeps components cleaner, more concise, and easier to test.
Airlines custom hooks
// useAirlines.js
import { useSelector } from 'react-redux';
import {
  selectAirlineName,
  selectAirlineFoundation,
} from '@features/airlines/airlinesSelectors';

// Select airline name
export const useAirlineName = (airlineId) =>
  useSelector((state) => selectAirlineName(state, airlineId));

// Select airline foundation
export const useAirlineFoundation = (airlineId) =>
  useSelector((state) => selectAirlineFoundation(state, airlineId));
Countries custom hooks
// useCountries.js
import { useSelector } from 'react-redux';
import { selectCountryName } from '@features/countries/countriesSelectors';

// Select country name
export const useCountryName = (countryId) =>
  useSelector((state) => selectCountryName(state, countryId));
Pointers custom hooks
// usePointers.js
import { useSelector } from 'react-redux';
import { selectPointersByAlphabeticalOrder } from '@features/pointers/pointersSelectors';

// Select all pointers by Alphabetical order
export const usePointersByAlphabeticalOrder = (pointersId) =>
  useSelector((state) => selectPointersByAlphabeticalOrder(state, pointersId));
Beyond Simple Hooks
While the examples above show simple wrappers around selectors, custom hooks can be more powerful:
- Combine multiple selectors
- Include conditional logic
- Provide computed or derived values
- Handle side effects or local state in addition to global Redux state
By building these abstractions into hooks, we create consistent, reusable patterns across the app that improve maintainability and scalability.
7- Using Custom Hooks to Display Data in Components
Now that we've created custom hooks to access the Redux state, we can use them to select and display the data cleanly in our UI components. Below are two components:
- Airlines: fetches and normalizes the data
- AirlineCard: consumes the data using custom hooks and renders it
The Airlines component below is a simplified version of a more complete one available in my GitHub repository. This version is meant to demonstrate how we can retrieve the pointers using a custom hook and pass their associated IDs down to the AirlineCard component. Each AirlineCard then uses these IDs to select and display specific pieces of data from the Redux store through dedicated custom hooks.
// Airlines.jsx
import { useParams } from 'react-router-dom';
import { usePointersByAlphabeticalOrder } from '@hooks/usePointers';
import AirlineCard from '@components/AirlineCard';

export default function Airlines() {
  const { region } = useParams();
  // Get the pointers by using the region as ID
  const pointers = usePointersByAlphabeticalOrder(region);

  // If there are no pointers (empty array), return null
  if (!pointers?.length) return null;

  return (
    <>
      <h1>{region}</h1>
      {/* Display an AirlineCard for each pointers entity ({ airline_id: 101, country_id: 201 }) */}
      {pointers.map(({ airline_id, country_id }) => (
        <AirlineCard
          key={`${airline_id}/${country_id}`}
          airlineId={airline_id}
          countryId={country_id}
        />
      ))}
    </>
  );
}
Next, we have the AirlineCard component:
// AirlineCard.js
import { useAirlineName, useAirlineFoundation } from '@hooks/useAirlines';
import { useCountryName } from '@hooks/useCountries';

export default function AirlineCard({ airlineId, countryId }) {
  const airlineName = useAirlineName(airlineId);
  const airlineFoundation = useAirlineFoundation(airlineId);
  const countryName = useCountryName(countryId);

  return (
    <>
      <h2>{airlineName}</h2>
      <div>
        <ul>
          <li>
            <strong>Foundation:</strong> {airlineFoundation}
          </li>
          <li>
            <strong>Country:</strong> {countryName}
          </li>
        </ul>
      </div>
    </>
  );
}
In this setup, the Airlines component retrieves the data for airlines by calling a custom hook (usePointersByAlphabeticalOrder) and passes the necessary IDs (such as airlineId and countryId) down to the AirlineCard. Each AirlineCard then uses custom hooks like useAirlineName, useAirlineFoundation, and useCountryName to pull the corresponding data from the Redux store.
This method helps to keep the components clean and ensures that we only fetch the necessary data in a way that is easy to manage and maintain.
Conclusion: 🚀 Wrapping Up Advanced Redux Toolkit Techniques
In this article, we've explored advanced Redux Toolkit techniques that enable you to scale and optimize state management in large React applications. By leveraging features like createAction, createSlice, createEntityAdapter, createSelector, and custom hooks, you can manage complex state efficiently, improve performance, and maintain modularity in your projects.
As your application grows, these techniques will help you streamline your state management, making it easier to manage cross-slice actions, normalize data, optimize data access, and create reusable hooks. Happy coding, and enjoy scaling your projects! 🙌🎉